


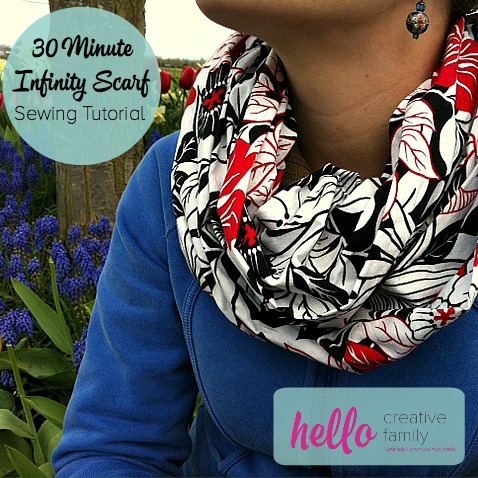
Tutorial- How To Sew An Infinity Scarf 30 Minute Project
This post and the photos within it may contain Amazon or other affiliate links. If you purchase something through the link, I may receive a small commission at no extra charge to you.
UPDATE: Check out our 15 Minute Kid’s Infinity Scarf Sewing Tutorial too and make a “mini me” version of the scarf featured in this tutorial.

You Will Need:
-2 yards of fabric (this will make two infinity scarves, or one infinity scarf and a strip of extra material)
-Thread
-Scissors or a rotary cutter (if using a rotary cutter you will also need a cutting mat)
-Ruler or seamstress tape
-Sewing machine
-Needle

Step 1: Select your fabric. You will need 2 yards. Cut your fabric in half lengthwise so that it measures approximately 22 inches in width by 2 yards in length. I leave the selvage on the fabric as this will be hidden on the inside of the scarf.
Note: We received this comment from a reader. I haven’t had any problems with the infinity scarves that I’ve made so far, but I’m learning every day and appreciate the tips. Beverly says: “You always want to cut off the salvages (aka the long edge on both sides of the fabric. One side will usually have the name of the fabric design, the fabric designer and circles with the colors that are in the fabric… look at the photo in step 5 for a picture of the salvage edge) of cotton and woven fabrics. The fabric on the salvage is very different from the rest as it is the part that attaches the waft and loft threads to the loom. It is more tightly woven then the rest and these edges will not shrink or relax in the same fashion as the main part of the fabric. You could end up with some very wonky seams and garments if you don’t remove the salvages before creating them.”

Step 2: Fold your fabric in half lengthwise and pin right sides together (so that the pattern is on the inside). You will have a long rectangle of fabric that is approximately 11″ in width and 2 yards in length.

Step 3: If the ends of your fabric are uneven this is the point where you will want to square them up. You will want nice straight end pieces for when you sew the two ends together later in your project.

Step 4: Sew along the length of your infinity scarf where you just pinned. I use a half inch seam allowance to make sure the selvage edge is hidden within my infinity scarf. When you get to the end back stitch. (Make sure you just sew along the length of the fabric, don’t do anything with the ends yet.) When you are done you will have a very long tube.

Step 5: Lay your scarf on your ironing board with the seam in the middle of the scarf. Using the tip of your iron press open the seam.

Step 6: Flip your scarf so that it is right side out. I just stick my arm through the hole in the middle, bunch it up until I could reach the other end and pull it through.

Step 7: Fold you infinity scarf in half so that the two open ends are laying on top of each other. It will now measure approximately 10″ by 1 yard. With the two ends of your scarf in your hands find the seam that you just pressed open. Pinch together so that the seams are lined up and the right side of the fabric is facing each other. Pin. Start working your way about a quarter of the way around the circle adding pins as you go. Bring to your sewing machine.
*Joining the two ends of the scarf together is the most confusing part. You can do it! Once you do it once it will be so easy.*
At this point it will look something like this:

Step 8: You are now going to be sewing the two ends of your scarf together. You will be sewing through two layers of fabric. I loop the bottom circle of the scarf around the bottom of my sewing machine and leave the top circle free. Start stitching around the circle leaving a half inch seam allowance.
*I find it works best if my right hand is in front of my sewing machine keeping the two pieces of fabric neatly lined up and pinched together, while my left hand was behind my machine guiding the fabric through.*

Step 9: Keep sewing around the circle slowly, making sure your edges are matched up. Once you get a little bit past half way around the circle the loop around the bottom part of your sewing machine will get too tight to continue sewing. Slip it off of the bottom of your sewing machine. Take your top section of fabric. Flip it inside out so it makes a little pocket and put the top section of scarf inside it. Bunch that part of the scarf down (where the bottom of my picture is) so it takes up as little room as possible.
*If you get confused look at the above picture, it really helps.*

Keep sewing your seams together until you are about to hit the part of the scarf you have in the pocket. (This should leave you a couple of inches to flip the scarf back right side out and hand stitch the remainder.) Backstitch, remove from sewing machine and pull scarf out of pocket.

When you take it off of your machine it will look something like this. Yay! The sewing machine part of this project is over.

Step 10: Tuck the raw edges inside the hole and pinch together.

Step 11: Pin.

Step 12: Hand sew the hole closed using a hidden stitch.
And voila! You have a beautiful infinity scarf! (I realized afterwards that I didn’t get a photo of the infinity scarf I was wearing above when it was all finished! Doh! I gave it away as a gift before I realized, so here is another one that I made.)

I hope that you have loved this Sew Creative Infinity Scarf Tutorial! Please let me know if you have any questions and I will do my best to help.
Make sure to check out our other Tutorials.


I’m sorry if someone already asked this, but did you prewash your fabric?
Hi Katelyn,
Thank you so much for visiting. I happen to be in the “pre-wash your fabric camp”. My mom has always prewashed her fabric in case of shrinkage so I do to. 🙂
Best Wishes,
Crystal
Thanks for the tutorial! Thumbs up for your tutorial, you shared the basic and easy to follow directions. I’m glad that I find this site, now; I can make my own infinity scarf! Thanks, really appreciated your article! A handmade scarf is the best gift as well – full of love by the giver.
Thanks for the tutorial! I had just finished making an infinity scarf and Googled “how to make an infinity scarf” just to see if I had done it right. lol Your website came up & you did it just the way I had just done! The only thing is that I had some really wide fabric and ended up just getting a yard and halving it twice, so I have a 2 yard scarf with two horizontal seams instead of one. Still looks good as my fabric is pretty busy. So anyway, thanks for the tutorial. I will now go check out your kids scarf tutorial & bookmark your site! 🙂
Hi April,
I’m so glad that my tutorial matched how you made your infinity scarf! Thank you so much for visiting. I appreciate you bookmarking my site.
Best Wishes,
Crystal
Thank you for the tutorial. One minor change that I made was to simply line up the seams inside with right sides together. ( and not turn it right side out after sewing the long side seam. ) for the last piece of machine sewing. This made it super easy to sew and turn.
I am a beginner sewer and I have a question, and maybe it’s a stupid question I don’t know… It said that this makes two scarves? When in your tutorial did it say to split it into two? Maybe I just missed a step? Thanks!
Hi Stephanie,
There is no such thing as a stupid question. I’m sorry if it was unclear. The 2 yards in length of fabric that you need for this project could be used to make 2 scarves. In step 1 you cut the fabric in half by length so that it is 22 inches in width by 2 yards in length. You would have 2 pieces of fabric in that size so you could make two scarves with it.
Does that make sense?
Thank you so much for visiting.
Best wishes,
Crystal
Just made a scarf. Sew a tube right sides together, leaving a 4″ opening in a long seam. Then reach inside the tube and pull one end to the other, leaving half inside the other half. The ends will be right sides together, just sew the whole tube together. Then turn right side out through the 4″ opening and slip stitch that opening. Tons easier!!! watched it on program Sew it All.
Great tip! Thanks for sharing Sandy!
Best Wishes,
Crystal
Hi! I am making this scarf as we speak, but I have a quick question. As I am working with this and thinking about it, I feel like two yards is a bit long. I know that includes seam allowance, but It seems like it’ll be really big even once you double it up. Any thoughts on this? Am I just not imagining it correctly? I don’t want to make it shorter without asking this question first since I am still a beginner! (:
Hi Hannah,
You absolutely can shorten it if you would like. The one in the photo is 2 yards, but you could shorten it as well. 60 inches would probably be fine. Thank you so much for visiting and for trying my tutorial! Let me know if you have any other questions.
Best Wishes,
Crystal
These directions were much easier to follow than another site I found. Thank you for really making it simple!
Thank you so much for your comment Marie. You have no idea how much they mean to me. When I created this post I was really going for that. I’m a very visual learner so wanted to make a tutorial that was visually easy to follow. Thank you so much for visiting and for your comment.
Best Wishes,
Crystal
I teach a group of young girls to sew and this will be a great project. Thanks so much!
Great tutorial. I have made lots of these for presents. They are so quick, easy and a fun project. I like the knit fabrics best as they sit better. Another tip is to use 2 different prints in the same scarf! Half and half. Makes for a great effect.
Hi!
Thanks for the tutorial! Although for a beginner, or if you haven’t got your material cut or your machiene ready… I wouldn’t quite call that 30 minutes! Also i was trying for ages how to figure out joining the scarf together, then decided to just figure it out myself, and then managed it. I would suggest doing the same – and maybe doing this video as a tutorial, as to explain that part in words is stuff- would be much better to be seen.
Thanks!
Amazing after I totally messed the scarf up, and then sorta figured out how to fix it, I got online and saw this wonderful tutorial. Duh, should have looked first but thought I knew what I was doing!!! This made so much sense. Thank you for the info.
This was a great tutorial! So quick! Thanks!
Thank you so much Jody!
Crystal
I will definitely start making some of those scarfs absolutely amazing. Thanks so much.
Just made one for a friend and it is perfect! What a quick and satisfying project!!
I have never been a scarf person but would really like to try one of these. I don’t want it too bulky so wondering if I use just one yard instead of two it would be smaller.
Hi Marjorie,
You can definitely experiment with it. What you want to make sure is that the length of the fabric is enough to wrap around your neck (and get over your head). Infinity scarves usually get looped twice so you want the length to be quite long. I think one yard would be too short, but you could definitely get away with less than two yards. You could also change the width of the scarf for a less bulky scarf.
Best Wishes,
Crystal
I love the pattern on that scarf! I’m going to Pin this, it’s a great gift idea! 🙂
Hello Crystal and all, I’m writing today to supply some information that may help some of you. It’s something my mother taught me on the first day she taught me to sew my first project – a handkerchief!
The edges of the fabric that are bulkier and more tightly woven are known as the SELVEDGE EDGES of the fabric. Very often, the name of the manufacturer and name of the fabric are printed there, as well as color dots that show what all colors are contained on the fabric. As has been noted, the selvedge edges of the fabric can cause ripples if left on pieces that are cut and sewn.
The selvedge edges are parallel to the straight of the grain, which is usually used with long pattern pieces aligned on the straight of the grain, so they hang properly when incorporated into a garment. For instance, a dress, skirt, pants, or long sleeves. The straight of the grain typically has less “give” than the cross-grain, which has more “stretch”. The cross grain is perpendicular to (at 90 degrees to) the straight of the grain. The most give is on the bias, which is situated at 45 degrees, or half way between the straight and cross grain. This is helpful when making bias tape for hems or arm hole trims, as it’s meant to curve easily and well, with no gaping.
I hope this info is helpful. I know it has been for me, and I’m glad my mother shared it with me so many years ago 🙂
Thank you so much for taking the time to visit and comment Kimberly! I actually do know about selvedge edges. This was one my very first posts that I published on my site, since publishing it all those years ago I know that it drives people crazy to see me sewing with the selvedge still on the fabric. LOL. I found that with this project keeping the selvedge in didn’t make a difference and made the fabric go a bit further but it’s not a practice that I do regularly with other projects. 🙂
I really do appreciate you taking the time to share all of your information with us! I also love that your mom passed a love for sewing on to you! That’s what Hello Creative Family is all about– parents creating a handmade, homemade, heart-made home for their children!
Best Wishes,
Crystal